
Introduction: The Rise of Personal Automation
In an era defined by digital interconnectedness, the ability to automate repetitive tasks has become increasingly crucial. Personal automation, once the domain of large enterprises, is now accessible to individuals seeking to optimize their workflows and reclaim valuable time. At the heart of this paradigm shift lies tools like n8n, a node-based, open-source platform designed to empower users to create complex automation workflows with ease. According to a recent study by McKinsey, approximately 30% of activities across various occupations could be automated, highlighting the vast potential for productivity gains through automation. As our digital lives become more complex, the need for intuitive and powerful automation solutions will only continue to grow.
This article delves into the process of building a personal automation server using n8n, exploring the benefits, technical considerations, and practical applications. Whether you’re a seasoned developer or a tech-savvy individual, this guide will provide you with the knowledge and resources necessary to harness the power of n8n and take control of your digital infrastructure. By hosting your own automation server, you gain unparalleled flexibility, security, and control over your data, paving the way for a more efficient and streamlined digital existence. The rise of low-code and no-code platforms like n8n has democratized automation, making it accessible to a wider audience and fostering a culture of innovation and efficiency.
Understanding n8n: A Node-Based Automation Platform
n8n stands out as a versatile and user-friendly automation platform due to its node-based architecture. Each node represents a specific task or function, such as connecting to an API, manipulating data, or sending an email. These nodes can be linked together to create complex workflows, allowing users to visually map out their automation processes. The open-source nature of n8n fosters a vibrant community of developers and users who contribute to the platform’s continuous improvement and expansion. Unlike proprietary automation solutions, n8n offers the freedom to self-host, ensuring complete control over your data and infrastructure.
The platform supports a wide range of integrations with popular apps and services, including Google Sheets, Slack, Twitter, and many more. This extensive connectivity allows users to automate tasks across various platforms, creating seamless workflows that span multiple applications. For example, you could create a workflow that automatically saves new tweets containing specific keywords to a Google Sheet, or one that sends a Slack notification whenever a new lead is added to your CRM. The possibilities are endless, limited only by your imagination and the available integrations. According to a report by Gartner, the integration platform as a service (iPaaS) market is projected to reach $7.5 billion by 2024, indicating the growing demand for integration and automation solutions.
Setting Up Your Personal Automation Server
The first step in building your personal automation server is choosing a suitable hosting environment. Options range from cloud-based virtual machines to local servers, each with its own set of advantages and disadvantages. Cloud-based solutions like AWS EC2, Google Cloud Compute Engine, and DigitalOcean offer scalability and reliability, while local servers provide greater control and privacy. For this guide, we’ll focus on setting up n8n on a cloud-based virtual machine, as it offers a good balance of convenience and control.
Once you’ve chosen your hosting environment, you’ll need to install Docker, a containerization platform that simplifies the deployment and management of applications. Docker allows you to run n8n in an isolated environment, ensuring that it doesn’t interfere with other applications on your server. After installing Docker, you can deploy n8n using a simple Docker Compose file, which defines the necessary configurations and dependencies. The n8n documentation provides detailed instructions on how to set up n8n with Docker, making the process straightforward even for beginners. Proper configuration of your server’s firewall and security settings is crucial to protect your automation server from unauthorized access.
Creating Your First n8n Workflow
With your n8n server up and running, it’s time to create your first workflow. The n8n interface is intuitive and user-friendly, allowing you to drag and drop nodes onto the canvas and connect them to create your desired automation flow. Start by defining the trigger node, which initiates the workflow. This could be a webhook that listens for incoming data, a timer that triggers the workflow at a specific interval, or an event that occurs in another application.
Next, add the necessary nodes to perform the desired actions. For example, if you want to send an email, you’ll need to add an email node and configure it with your email credentials. If you want to manipulate data, you can use the function node to write custom JavaScript code. The n8n documentation provides detailed information on each node, including its available options and parameters. Don’t be afraid to experiment and try different combinations of nodes to achieve your desired outcome. The n8n community is also a valuable resource for finding inspiration and solutions to common automation challenges. Consider this example of automating social media posts: a trigger node could be set to monitor an RSS feed for new articles related to a specific topic. Once a new article is detected, the workflow could automatically generate a social media post and publish it to various platforms using their respective API nodes.
Advanced n8n Techniques and Best Practices
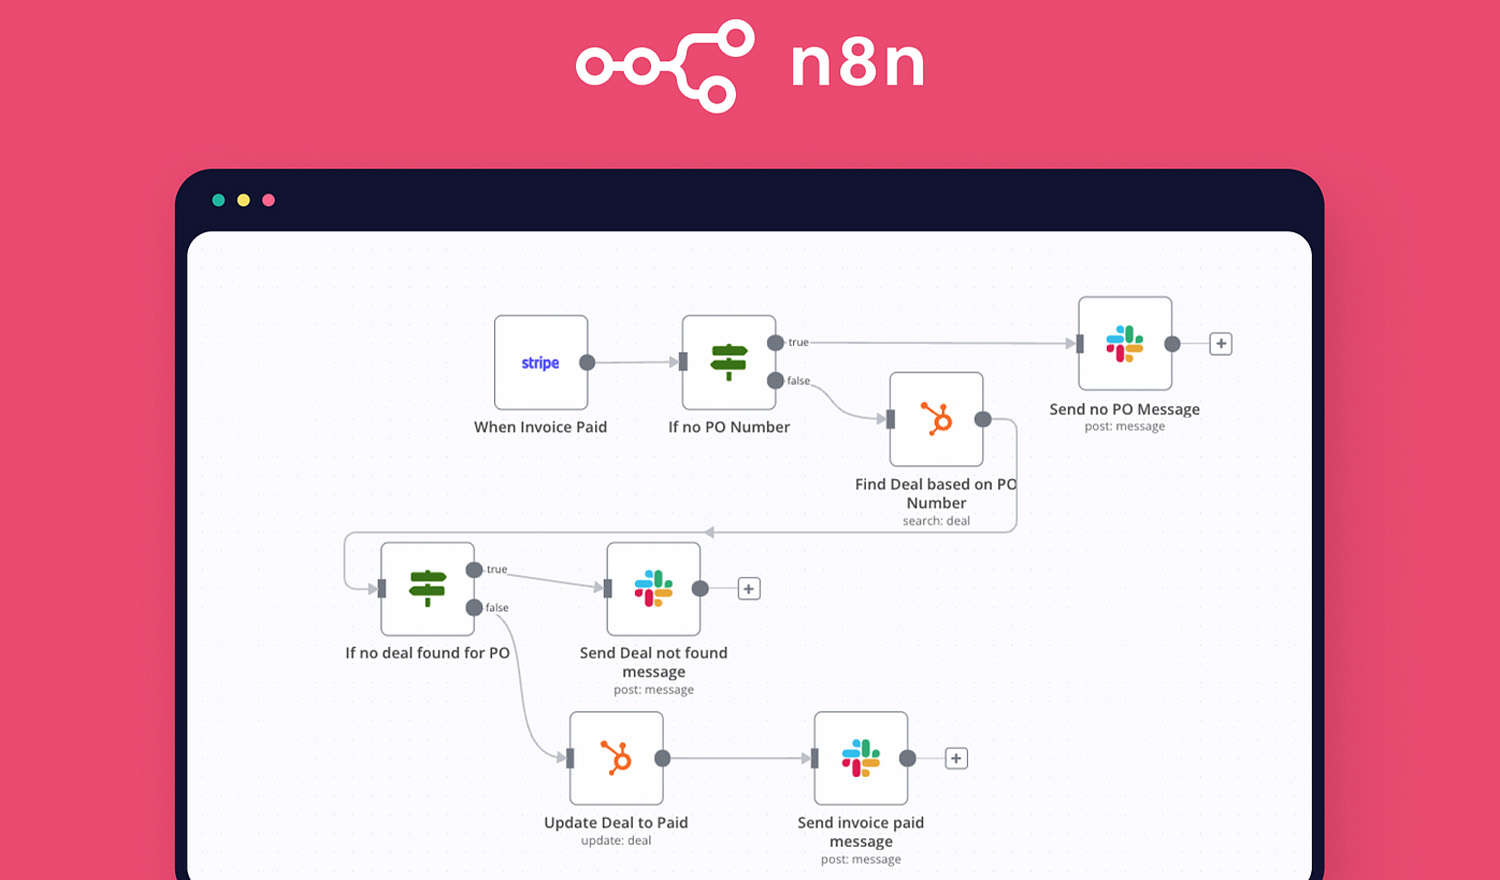
As you become more familiar with n8n, you can explore advanced techniques to create more sophisticated workflows. One such technique is using conditional logic to control the flow of execution based on specific criteria. The IF node allows you to create branches in your workflow, executing different paths depending on whether a condition is true or false. This enables you to handle different scenarios and create more dynamic automation processes.
Another advanced technique is using loops to iterate over data and perform actions on each item. The Item Lists node allows you to split data into individual items, which can then be processed by subsequent nodes in the workflow. This is useful for tasks such as processing a list of email addresses or updating multiple records in a database. When building complex workflows, it’s important to follow best practices to ensure maintainability and scalability. This includes using descriptive node names, adding comments to explain the purpose of each node, and breaking down large workflows into smaller, more manageable modules. Regularly testing your workflows and monitoring their performance is also crucial to identify and resolve any issues.
Conclusion: Empowering Your Digital Life with n8n
Building a personal automation server with n8n is a transformative step towards reclaiming control over your digital life. By automating repetitive tasks and streamlining your workflows, you can free up valuable time and focus on what truly matters. The open-source nature of n8n, combined with its intuitive interface and extensive integration capabilities, makes it an ideal platform for individuals and small businesses alike. As the demand for automation solutions continues to grow, mastering tools like n8n will become an increasingly valuable skill.
From automating social media posts to managing your personal finances, the possibilities are endless. By embracing the power of n8n, you can create a more efficient, productive, and fulfilling digital existence. The journey towards personal automation is an ongoing process of learning, experimentation, and refinement. Embrace the challenges, celebrate the successes, and never stop exploring new ways to automate your world. With n8n as your ally, you can unlock a world of possibilities and transform the way you interact with technology.


